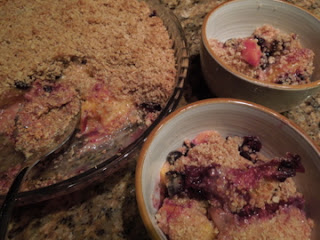
Peach and Berry Crumble with Almond Meal Topping
Ok, so you made your almond milk (here’s a recipe: http://eatingreadingwriting.blogspot.com/2012/08/almond-milk-vitamix-way.html)
and, hopefully, decided that it’s so tasty and so clearly good-for-you that you
want to continue making batches of this cinnamon-y yumminess. For my part, I rarely go a day without either
soaking almonds in preparation for
milking or actually drinking almond
milk. So then what to do with all that
ground almond after it goes through the blender, the strainer, and the
cheesecloth? Here’s a simple solution:
Use it!
Drying out Almond
Grounds
After you squeeze out as much milk as you can, you will be
left with a fairly sizable ball of finely ground almond. Pre-heat the oven to 300 degrees and then
spread the almond meal out on a rimmed baking sheet and let some more moisture
evaporate while the oven warms up to temperature. Then place the sheet in the oven and let the
ground slowly—and gently—dry out. You
don’t really want the oven to be hot enough to cook or roast the grounds.
After about 10 minutes, take a fork and break up remaining
clumps into smaller chunks. Repeat about
every 5 minutes until the mixture feels dry enough. Don’t let it brown! The whole process might take about 20
minutes. Remove from the oven and let
cool—and dry further.
Once the mixture is cool enough to handle, scrape all the
almond grounds into a mini-processor and pulse repeatedly until the mixture has
the consistency of coarse kosher salt.
If you started by soaking 1 cup of whole almonds, you might be left with
about 2/3 cup of almond meal for cooking.
The mixture you are left with probably will not be fine enough for
recipes like cake batter. (For a
flourless chocolate cake recipe that calls for almond flour or meal, I would
use fresh ground or purchased almond meal.)
However, the dried almond grounds are perfectly acceptable for recipes
like streusel toppings.
Preparing a Fruit
Crumble with Almond Grounds
The website Chocolate & Zucchini offers a recipe for
Mango Apple Crumble (http://chocolateandzucchini.com/archives/2006/01/mango_apple_crumble.php)
that you could use the dried almonds grounds in. For the pictured dessert at the top of this post (Peach and
Berry Crumble), we modified Barefoot Contessa’s Peach & Blueberry Crumbles recipe to include our almond meal and made a single large crumble instead of
individual serving sizes. While we find
Ina Garten’s desserts easy and delightful, we find that we don’t need as much
sugar as she normally calls for, so it works well for us to find a balance
between Barefoot Contessa’s over-sweet and Chocolate & Zucchini’s almost
Spartan recipes.
1. Preheat oven to 350 degrees.
2. Prepare the fruit.
5 large peaches (or nectarines), peeled and cut into wedges
1 ½ cups mixed berries (defrosted if you are using frozen
berries)
1 t. finely grated lemon zest
1 T. fresh lemon juice
½ c. sugar
¼ c. flour
Mix all ingredients together and let sit for a few minutes
for flavors to meld. Pour into a large
pie dish (9-10 inches) or a small casserole dish.
3. Mix the crumble topping.
1/3 c. cold unsalted butter cut into pieces
1/3 c. sugar
Pulse butter and sugar few times in a food processor to mix.
¾ c. oatmeal (quick-cook)
2/3 c. almond grounds/meal/flour
¼ t. salt
Add the above to the butter mixture and pulse a few more
times to combine and then sprinkle the mixture over the fruit.
(Note: We used a little less butter and sugar originally in following
the Chocolate & Zucchini recipe, but we found that we wanted a bit more
streusel-ly a texture. You might see in
the photo above that the topping looks fairly loose and dry. If you would prefer it that way, use ¼ cup
butter and ¼ cup sugar.)
4. Bake the crumble.
Bake for about 45 minutes until you have thick fruit juices
bubbling up. Remove from oven, cool
slightly, and serve. Vanilla ice cream
is always a nice addition as dessert. We
actually also had this dish in the morning over unsweetened Greek yogurt, and
it made an extra-special yogurt parfait!


Comments
Post a Comment